step-by-step guide to create a bootable medium using flash drive
Nerat Pam
- 1
- 182

Creating a Bootable Flash Drive: A Step-by-Step Guide
If you’re looking to install or run an operating system from a USB flash drive, creating a bootable drive is essential. Follow these steps to create your own bootable flash drive:
1. Choose Your Operating System:
Before starting, decide which operating system you want to make bootable on your flash drive. Whether it’s Windows, Linux, macOS, or any other OS, ensure you have the correct ISO file for the version you want to use.
2. Download the ISO File:
Head to the official website of the operating system you’re interested in and download the corresponding ISO file. Make sure to select the appropriate version (32-bit or 64-bit) and edition if necessary.
3. Download Bootable USB Creation Tool (Optional):
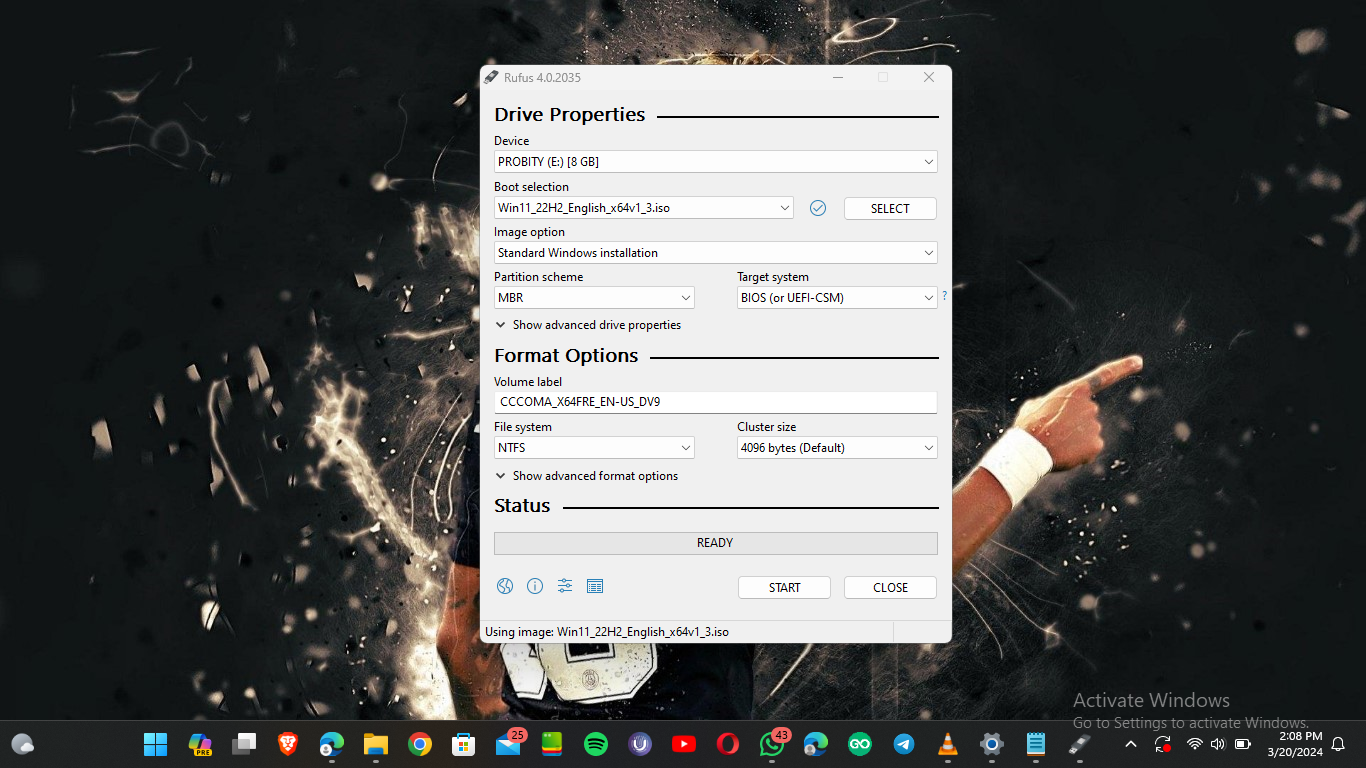
Some operating systems offer dedicated tools for creating bootable USB drives, such as Rufus for Windows or balena Etcher for Linux. If you prefer using one of these tools, download and install it.
4. Insert the USB Flash Drive:
Plug your USB flash drive into an available USB port on your computer. Keep in mind that all data on the flash drive will be erased during the process, so ensure there’s no important information on it.
5. Format the USB Drive (Optional):
If your USB drive isn’t already formatted as FAT32, you may need to format it. Use your computer’s disk management tools or those provided by the bootable USB creation tool to format the drive.

6. Open Bootable USB Creation Tool:
Launch the bootable USB creation tool you’ve chosen, such as Rufus or balenaEtcher.
7. Select the ISO File:
Within the bootable USB creation tool, locate the option to select the ISO file you downloaded earlier. Navigate to the file’s location and select it.
8. Choose USB Drive:
From the list of available drives in the tool, select your USB flash drive. Double-check that you’ve chosen the correct drive, as all data on it will be erased.
9. Start the Process:
Initiate the process of creating the bootable USB drive. Depending on the tool, this may involve clicking a “Start” or “Create” button.
10. Wait for Completion:
Allow the tool to copy the contents of the ISO file to the USB drive and make it bootable. This process may take some time, so exercise patience.
11. Eject the USB Drive:
Once the process is finished, safely eject the USB drive from your computer.
12. Boot from the USB Drive:
Now, you can use the bootable USB drive to install or run the operating system. Insert the USB drive into the target computer and restart it. You may need to access the boot menu or adjust the boot order in the BIOS/UEFI settings to boot from the USB drive.
With these steps, you should have successfully created a bootable USB flash drive containing the operating system of your choice.


I am not sure where youre getting your info but good topic I needs to spend some time learning much more or understanding more Thanks for magnificent info I was looking for this information for my mission